
Thanksgiving Table Crafts
Hands-on craft ideas to entertain kids on Thanksgiving.
The wait for the Thanksgiving turkey can seem endless, especially for hungry little ones. Creating a child-friendly and interactive table gives kids something to do while they wait and keeps them occupied while the grown-ups talk. Whether you set up a separate kids’ table or make a special spot at the big table, these projects will make the younger crowd feel like a part of the celebration.
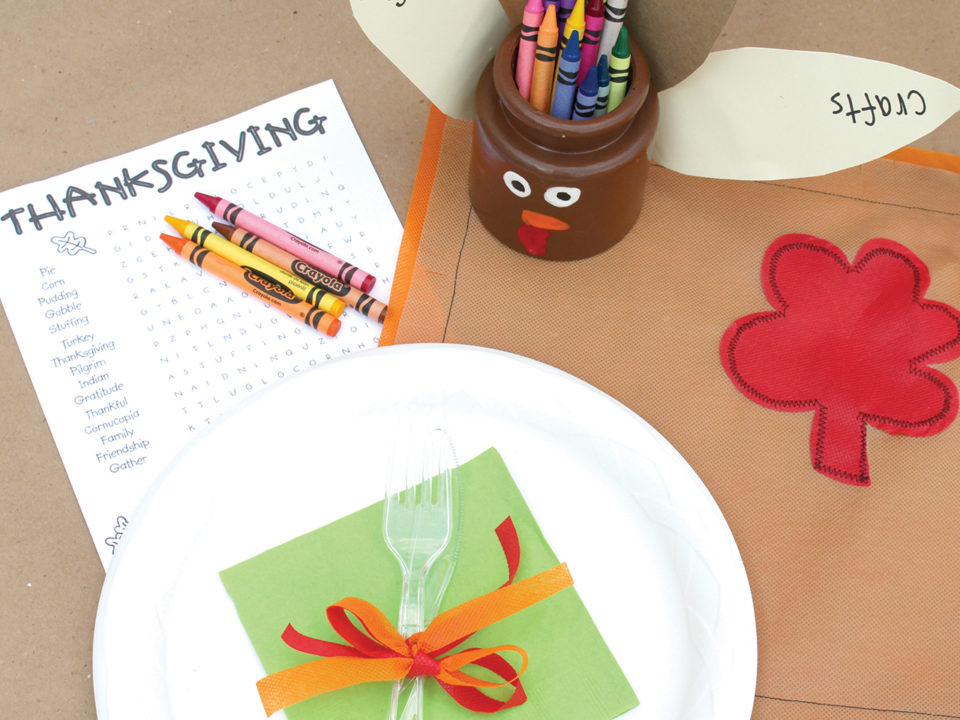
To begin, cover your table or a separate kids’ table with butcher (kraft) paper to create a space for doodling and coloring. Make a couple doodles and games on the paper before the meal to get kids started. Add an extra layer of paper or a plastic tablecloth underneath to protect the table from possible marker mistakes.
Place markers or crayons in hand-painted turkey jars (see right) so they can easily be passed around and collected when it’s time to eat. They also work as a place for children to share the things for which they are thankful.
To help kids feel like they’ve added a special touch of their own to the Thanksgiving table, have them create place cards and place mats (see right), using felt or Oly-Fun, a material that works like fabric but cuts like paper.
Hand-Painted Jar Turkeys
Supplies:
- Jars (recycled or small canning jars)
- Paints (Apple Barrel Paints in brown oxide, pumpkin orange, bright red, black, and white)
- Decoupage glue (Mod Podge)
- Paint brush
- Hook-and-loop fasteners (Velcro Brand Thin Clear Fasteners)
- Colored cardstock for feathers
Instructions:
- Paint the entire outside of the jars with brown paint. Let dry.
- Paint white circles for the eyes. Let dry. Add black to the eyes once the white is dry.
- Add the turkey’s beak and wattle with orange and red paint.
- Let all the paint dry completely then add a thick layer of matte Mod Podge.
- Cut feathers out of cardstock. Separate the hook-and-loop fasteners and add one side to the back of the jar and one side to the front of the feathers.
- Write what you are grateful for on the feathers, or let each guest write their own items. Match up the hook-and-loop on the jar and on the feathers to make them stick.
Place Mats
Supplies:
- Oly-Fun fabric
- Scissors
- Glue
Instructions:
- Cut fabric in a large rectangle, circle, or 12-inch square. If using Oly-Fun, no need to hem or finish the edges, the cloth will not fray.
- Cut fun shapes, letters, or borders from a coordinating color of fabric to decorate the place mats. Glue or sew the shapes on top of the place mat.
- Cut a fringe around the edge of the place mat, if desired.
- Use leftover scraps of fabric to tie up silverware at each place.
Pumpkin Place Cards
Supplies:
- Felt (Kunin)
- Scissors
- Felt glue (or needle and thread)
- Ribbon
- Die-cuts or stencils for shapes and letters
Instructions:
- Cut out two pumpkin shapes per place card.
- Glue two pumpkin shapes together to create a sturdy place card.
- Cut a stem for each pumpkin out of brown felt.
- Use stencils to trace each child’s name or initials onto felt and cut out.
- Cut a short piece of ribbon and tie in a bow.
- Glue all embellishments to the front of each pumpkin.
After the holiday meal, the place cards can be hung with clothespins to a long piece of twine to create a decorative garland.


