You Will Need:
- Tree branches (about 10)
- Vase or container
- Scissors
- Pencil
- Bowl
- Clippers (to cut and trim tree branches)
- Craft paper (brown, tan, cream, pink)
- Felt (dark brown)
- Seed beads (brown, pink, yellow, blue)
- Glue (Craft Bond; something strong to hold beads to craft paper)
- Brown marker
- String
- Leaf and acorn patterns (available here)
Directions:
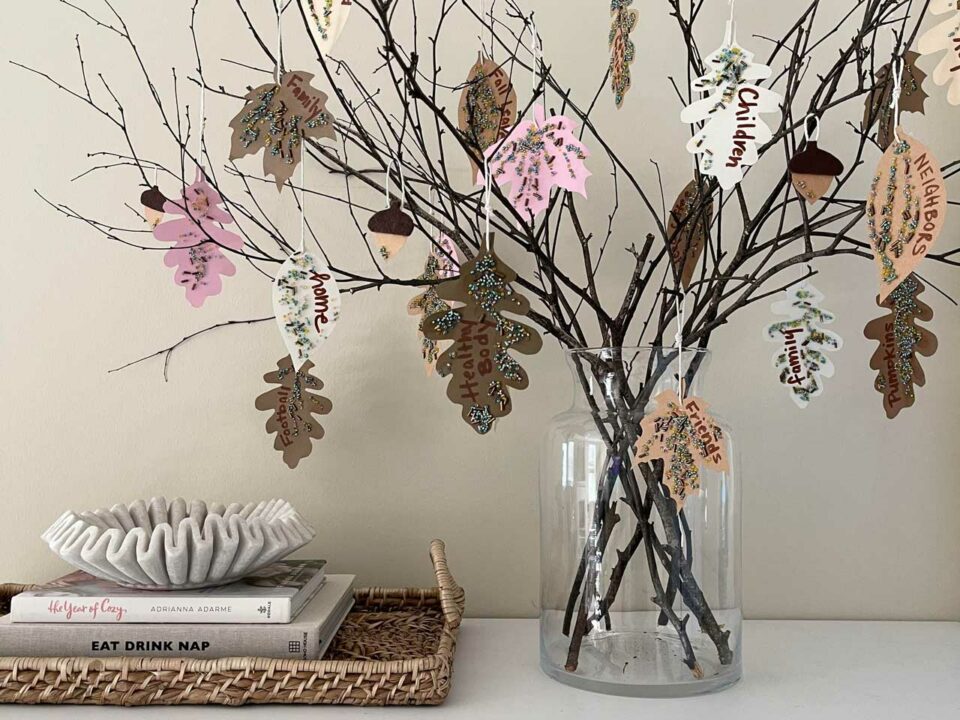
- Collect tree branches and use clippers to cut the branches to the height that will fit in your vase. Arrange the trimmed branches in the vase.
- Print and cut out leaf and acorn patterns. Trace the patterns with a pencil on craft paper (three to four leaves of each color and six acorns). Cut out each leaf and acorn.
- To make fuzzy tops for the acorns, cut the nut part of the acorn off of the pattern. Use the top of the acorn pattern to trace with a marker onto the felt and cut it out with scissors. Glue the felt cut outs on the top of the acorns; set aside to dry.
- Use markers to write something you are grateful for on each leaf. Enlist help from the kids to offer suggestions.
- Mix all of the beads together in a bowl. Draw lines and swirls of glue onto leaf cutouts and sprinkle beads onto glue. (Tip: Hold the leaves over the bowl of beads as you sprinkle to avoid making a mess. Shake off excess beads.) Lay leaves flat to dry overnight.
- Cut pieces of string (about five inches long for the leaves and two inches long for the acorns).
- Use scissors to carefully poke a hole in the base of each leaf and the top of each acorn. Thread one piece of string through each hole and tie a knot in the back.
- Hang the leaves and acorns on the branches.
Makayla Shartle loves to share recipes, crafts, and all things holiday on her blog, makaylaandco.com.