

Globally-Inspired Family Dinner Recipes
Expand your child’s palate by introducing them to tasty and diverse dishes from around the world. Try these kid-approved recipes from Colorado chefs and cooks.
If I’m being honest, the words, “Look, mac and cheese!” and “Oh! Mini corn dogs!” have come out of my mouth just a few too many times over the years, as I spotted my kids’ favorites on international restaurant menus. I have a love-hate relationship with these kid-menu staples; while I want to try new restaurants and diverse dishes myself, I want my kids to feel comfortable and actually love what they are eating alongside me. But what if they could be comfortable and love what they are eating regardless of the type of restaurant we try?
It starts by getting them involved with cooking at home, experts say. “They’ll be more interested in eating if they’ve had a hand in the making,” says Deanna F. Cook, author of the multicultural kids cookbook Cooking Class Global Feast. “Taste is acquired. You have to educate their palates and constantly reintroduce foods.”
To help do so, here are five recipes from Colorado chefs representing dishes from different cultures. You’ll nurture adventurous eating, challenge their independent skills, and teach respect for other cultures without leaving your home kitchen. Bon appétit!
Japanese
Sushi – 寿司

“While the history of sushi dates back thousands of years, many of the types of sushi we know today, like California Rolls, are the result of western chefs adapting new ingredients with old techniques. Sushi is a perfect introduction to Japanese food for kids because of the infinite ways they can combine ingredients of their choosing, plus the fun of rolling sushi. I’ve loved teaching kids to enjoy it at an early age, and even had a three-year-old who came [for a cooking class] with her older sister and her mom. She was actually quite adept at rolling her own!” —Michele Morris, chef/owner, Cooking With Michele
Sushi Rice Ingredients
- 2 cups sushi rice, rinsed several times to remove excess starch
- 4 cups water
- ½ cup rice wine vinegar
- ⅓ cup sugar
- ½ teaspoon salt
Directions
- Combine the rinsed rice and water in a covered saucepan and cook according to package directions.
- While the rice is cooking, combine the vinegar, sugar, and salt in a small saucepan and heat just to dissolve the sugar, and salt; set aside to cool.
- Fold the seasoned rice vinegar into the warm rice with a paddle or wide spoon, mixing and fanning until the rice is cool enough to handle. Yields enough for four to eight sushi rolls.
Maki Sushi Ingredients
- 8 nori (seaweed) sheets
- 4 cups cooked sushi rice
- 1 cucumber, seeded and julienned in 4-inch long strips
- 1 carrot, grated
- 2 avocados, pitted and sliced
- Scallions, cut into 4-inch pieces
- Wasabi, optional
- Other fillings of choice (sushi-grade fish, cooked chicken, cooked shrimp, etc.)
Directions
- Lay a nori sheet shiny side down on a sushi mat. (Rice will adhere better to the rougher side of the nori sheet.)
- Press about ¹3 to ½ cup of sushi rice onto the nori, leaving a ½-inch gap at the top.
- If using, spread a small line of wasabi across the rice, then layer with about ½ inch of fillings of your choice in the center next to the wasabi. Don’t overfill, or the roll will be difficult to seal and slice.
- Roll the nori from the edge closest to you, up and away from you, using the sushi mat to press it into shape.
- Place seam side down to cut into eight pieces with a clean, sharp knife. To create even pieces, cut each roll in half, then each half in half, then each quarter in half. Wipe the blade between each cut with a wet towel to remove any rice, which will interfere with making a clean cut. “Saw” back and forth with the knife instead of pressing the knife down. (This will avoid pushing the filling out of the ends.)
Tips and Notes
“Don’t worry if kids’ rolls are messy or if they combine what might seem like a strange choice of ingredients into their rolls—it’s all about experimenting and tasting,” advises Morris. Sushi is traditionally eaten with your fingers, so no need for kids to struggle with chopsticks if they find them difficult to use. When rolling the sushi, to make sure your child’s rice ends up on the nori and not all over their hands, have them dip their fingers in water frequently when spreading the rice (shake off excess so they don’t drench the nori). Use fingertips only to spread the rice, or wear plastic gloves.

Russian
Blinchiki – блинчики

“I was four years old when my family emigrated to America in 1991, but my parents did a phenomenal job of exposing the kids to the Russian culture, food, and people. Blinchiki, which are very similar to French crepes, is a childhood favorite that every Russian can relate to, and is a constant staple in casual home atmospheres, as well as for parties and celebrations. My mom taught me how to make them when I was 14, cooking for a family of 10, without a written recipe. There is a Russian saying, ‘The first Blinchiki will be a disaster.’ Oftentimes that was the result of a pan that may not have been heated enough, but no matter, it was the official license to do a taste test!” —Victoria Ovcharenko, chef/food blogger, Welcome 2 Our Table
Ingredients
- 2 cups flour
- 1 teaspoon salt
- ½ teaspoon baking powder
- 1 tablespoon sugar
- 1 teaspoon vanilla extract
- 6 eggs
- 2 cups milk
- 4 tablespoons oil
Directions
- Whisk together the eggs in a medium bowl.
- Combine the flour, salt, baking powder, and sugar. Add mixture to the eggs. Batter should be thick.
- Gradually pour in the milk, whisking the batter into a smooth consistency.
- Add vanilla extract. Cover and place in the refrigerator for 30 minutes.
- Stir the batter and add oil.
- Preheat a crepe pan or a nonstick skillet on high heat.
- Using a ladle, pour the batter onto the pan while simultaneously swirling the pan with the other hand to spread the batter evenly to cover the skillet.
- Once the edges of the crepe begin to look dry and start to color, flip it over and cook for another 30 seconds. Repeat until all the batter is used up.
Tips and Notes
Add more milk to the batter if the Blinchiki come out too thick. Encourage your kids to help with every step of the process, including cooking them, advises Ovcharenko. “[Cooking] Blinchiki takes a little practice, but my boys love a challenge,” she says. Blinchiki can be basted with melted butter as soon as they come off the skillet if eating them right away. Top or fill with jam or a sauce. A favorite among Russian families and kids is a sweetened cream cheese filling; a common savory Russian choice is a minced meat filling with caramelized onions.

Native American
Three Sisters Salad with Maple Vinaigrette

“The three sisters—corn, beans, and squash—grow in harmony together, and that’s why they were important to Native communities. Beans use the stalk, and squash use the shade as the corn grows. They can be grown at home with the family, and the way they grow together creates an efficient way to use land and water. Growing up, my mother was the main cook, and she and my father ingrained in us that you need to cook so you can take care of those you care about.” —Ben Jacobs, co-owner, Tocabe
Ingredients
- 1 medium zucchini
- 1 yellow summer squash
- 2 ears of corn
- 1 cup cooked black beans (or canned black beans)
- 3 stalks scallion/green onion
- 1 yellow bell pepper (or red or green pepper)
- 2 tablespoons maple syrup (or agave nectar or honey)
- 1 teaspoon Dijon mustard
- 1 cup sunflower oil
- 2/3 cup apple cider vinegar
- Kosher or sea salt and pepper, to taste
Directions
- Wash all produce and set aside; shuck and wash corn.
- Heat an outdoor grill or oven broiler to high. Roast corn on all sides, being careful not to burn it; set aside. When corn cools, cut kernels from the cobs.
- Cut zucchini and squash into small cubes, slightly larger than the size of corn kernels.
- Chiffonade scallions (cut into long, very thin strips).
- Dice yellow bell pepper into very small pieces.
- Rinse beans well with cold water.
- To make vinaigrette, combine sunflower oil, apple cider vinegar, mustard, maple syrup, salt, and pepper in a mixing bowl and whisk to combine, or use a food processor.
- Combine all ingredients in a large mixing bowl and toss.
- Slowly add vinaigrette, saving some for later. (Adding all the dressing will overwhelm the flavor of the salad.)
Tips and Notes
The corn, beans, and squash can be substituted with similar ingredients throughout the year, depending on what you might have in your home garden. In the summer months, try sunburst or patty pan squash. In the fall and winter, switch to cooked acorn or butternut squash. Pinto, Great Northern, or tepary beans can be substituted for black beans. Roasting the corn is optional; canned corn could be substituted to simplify the recipe process.
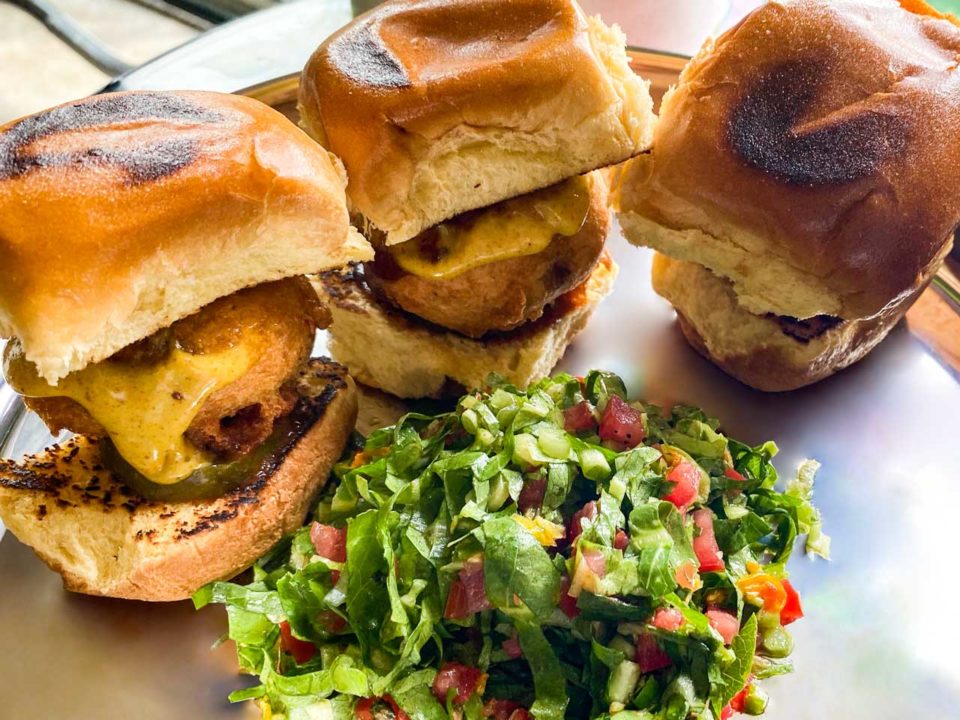
Indian
Vada Pav – वडा पाव
Vegan Potato Sandwich

“Vada Pav is a classic Mumbai street food, brought to Jamaica through the Indian workers who came to the island in the late 1800s to early 1900s. Growing up in Jamaica, my grandmother would make this for us, and I didn’t know what it was. All I knew was that I wanted at least three, it is so good! I was raised in the Rastafarian culture, and eating meat was not in our diet. Honestly, that helped to shape my culinary career. It helped me to understand how one can use something like a potato and make it delicious.” —Tajahi Cooke, chef/owner, Ms. Betty’s Cooking
Ingredients
- 4 potatoes, peeled
- 1 ½ cups red pepper hummus
- 2 tablespoons olive oil
- ¼ cup chopped cilantro
- ¼ cup yellow curry powder
- ¾ tablespoon salt
- 1 pinch ginger
- 5-6 garlic cloves
- ¾ tablespoon mustard seeds
- ½ cup green onion
- ¾ cup chickpea flour
- 10 Hawaiian rolls or slider buns
Batter Ingredients (to fry the Vada)
- 1 cup chickpea flour (or rice flour for a crispier texture)
- 1 tablespoon ground turmeric
- ½ tablespoon salt
- ¼ tablespoon baking soda
- ¼ cup water
- ½ cup soda water, add more if needed
- 2 quarts peanut or grapeseed oil
Directions
- Add potatoes, water, and salt to a stock pot. Bring to a boil. When potatoes are fork tender, strain in colander and mash, draining them of most of their liquid.
- Heat one tablespoon oil in a pan on medium heat. Once oil is hot, add mustard seeds, garlic, ginger, and green onions. Sauté for two to four minutes. Once aromatic, place in a small storage container and store in the refrigerator.
- Add hummus, cilantro, curry powder, salt, and chickpea flour to the potatoes. Add the ginger mixture. Mix well and form lemon-sized balls out of the potato mixture (should make about 10 balls).
- To make the batter in which you fry the Vada, combine ½ cup chickpea flour in a large mixing bowl with turmeric, salt, and baking soda. Start adding water, little by little. If the batter is too thin, gradually add the remaining ¼ cup chickpea flour.
- Whisk to form a smooth batter. Add extra tablespoons of water to reach a desired consistency. The batter should be a medium consistency to cover the potato balls fully; neither too thick nor too thin.
- Heat peanut oil to 375 degrees.
- Dip potato balls into the batter.
- Gently submerge potato balls in the oil and cook for 6 minutes, or until golden brown.
- Remove from oil and serve on a slider bun; spread with curry mayo and tomato chutney.
Tomato Chutney (sandwich spread)
Ingredients
- 1 cup diced tomato
- ¼ cup diced poblanos
- 1 tablespoon allspice
- ¼ cup lemon juice
- ½ cup grated ginger
- ¼ cup diced red onions
- ½ teaspoon tomato paste
- ¼ cup white distilled vinegar
- ½ cup ketchup (use a spicy ketchup to counteract the sweetness)
- ¾ cup sugar
Directions
- Heat two teaspoons of oil in a pan on medium heat. Then add the onions and sauté for two to four minutes or until translucent.
- Add poblanos, allspice, ginger, and lemon juice. Sauté for two to four minutes.
- Add tomato, tomato paste, vinegar, ketchup, and sugar; allow the chutney to cook on low-medium heat for 20 to 30 minutes.
- Place in a storage container in the refrigerator.
- Puree to create a smooth sauce.
Curry Mayo (sandwich spread)
Combine all ingredients:
- ½ cup vegan mayonnaise (Veganaise)
- 1 ½ cup yellow curry powder
- ¼ cup lemon juice
- 2 tablespoons salt
Tips and Notes
It’s recommended that Vada Pav be served with both the curry mayo and tomato chutney at the same time. “The combination of the tomato and curry creates a bite with the fried Vada like no other,” says Cooke. Have your kids try a taste of each before spreading them on the sandwich.

Ethiopian
Kik Alicha – ክክ አልጫ
Yellow Split Peas

“This dish is good for kids because it’s mild and very flavorful. Most kids take to it quickly, and both my kids love it! For families, [try it] with an open mind. Many people are tentative when looking at an Ethiopian restaurant menu, but when they actually try it, they end up loving it.” —Benny Yohannes, former owner, Saba’s Ethiopian Food
Ingredients
- 1 pound (about 2 cups) dried yellow split peas
- 1 yellow onion, chopped
- ½ teaspoon garlic, minced
- ½ tablespoon turmeric
- ¼ cup vegetable oil
- Salt, to taste
- Pepper, to taste
Directions
- Rinse peas in cold water.
- Place chopped onions in a food processor and puree.
- Heat pureed onions in a skillet on high heat until caramelized (golden brown in color).
- Boil 3 cups of water in a large pan.
- Add peas, caramelized onions, and vegetable oil, on medium heat. Simmer until peas are al dente, about 1 hour.
- When peas have softened, add garlic, turmeric, salt, and pepper. Cook for five to 10 minutes longer.
Tips and Notes
Ethiopian food is not served with utensils, but instead with gluten-free injera—a spongy bread. Purchase injera from a local Ethiopian restaurant prior to making this dish, and show your kids how to scoop up bites of the stew inside small pieces of the bread, as it would traditionally be served. When making Kik Alicha, “Stay patient,” says Yohannes. “It is a trial and error type of recipe, and takes some repetition.”
Have a Picky Eater? Try This!
In addition to cooking with your kids at home, Deanna F. Cook offers these suggestions for getting picky eaters to try new foods.
- When visiting restaurants from other cultures, don’t look at the kids menu first. Instead, encourage your kids to choose a soup or a couple of side dishes. These often will be even less expensive than the kids menu options.
- Many kids love bread, so let them order the traditional bread from that culture, such as naan (Indian), injera (Ethiopian), bao buns (Chinese), or pita (Middle Eastern) as their meal. It’s a start!
- When ordering from restaurants, order several menu items or appetizers and eat family style, allowing everyone to sample a small portion of all the dishes.
- Invite a friend to dine with you. “Peer pressure works,” Cook says. “My own daughter would always try new things with a friend.”
- Garden together. “[Kids] might say they don’t like tomatoes, but when they pick a cherry tomato off the vine and eat it, it’s different,” Cook says.
- Say yes to dessert. Many restaurants from other cultures will offer desserts that vary in color, texture, and taste; including special ice cream flavors.
PB&J Equivalents Around the World
Kids around the world have their own quick, inexpensive, go-to snacks and lunches that are as common as the peanut butter and jelly sandwich in the United States. Here are a few featured in Cooking Class Global Feast.
- Pan Con Tomate (Spain, smashed tomato on toasted bread)
- Banh Mi (Vietnam, pickled carrots and cucumbers, fresh mint, cilantro, and meat on a baguette)
- Croque Monsieur (France, grilled ham and cheese on sliced bread with creamy white sauce)
- Körözött (Hungary, a butter, cream cheese, caraway seed, and paprika mixture on crackers)
- Beans on Toast (England, canned British beans in tomato sauce on sliced bread)


